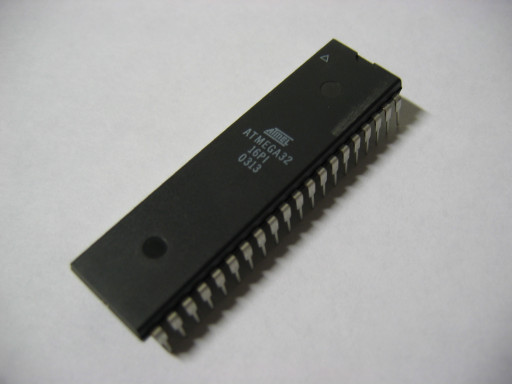
Ok, so here goes, this is what an AVR ATMega32 looks like:

I have this one and I will be using this in most of the things I am gonna do and put up here.
This particular packaging is called DIP(Dual In-line Package), this one has 40 pins and the numbering starts from the arrow at the top left and ends to the right of the arrow, now I am gonna copy some characteristics off of its datasheet, which you can download from the Atmel site.
Oh! and here comes the PINS:
Now lets just take a look at the above;
- Port A/B/C and D
These are the 4 I/O ports on this uC, all are 8-bit, each pin representing one bit and hence one port makes a complete byte, all 8 pins of any port can be used for input or output in any combination you like, all these pins have alternate functions as well. Right now, just remember that these are the pins which we will be using to provide inputs and get outputs from the uC.
Port A: Pins 33 to 40
Port B: Pins 1 to 8
Port C: Pins 22 to 29
Port D: Pins 14 to 21
- Reset (Pin 9)
This is the pin which when grounded causes the uC to RESET (or RESTART), it can be used whenever necessary.
- VCC (Pin 10)
This is the one pin, which makes all the magic happen, it is the input voltage pin of the AVR, for the case of ATmega32, it should be connected to a regulated+filtered supply of 4.5 to 5.5 volts
- GND (Pin 11)
For the ground connection, that’s enough here
- XTAL2& XTAL1 (Pins 12 and 13)
It might be a little difficult to understand for now, if you have just begun uCs, but this is the most crucial thing for any uC, it can be considered as the HEART BEAT of the uC, the uC works on every beat from these two pins, so we attach these to an oscillator/crystal which provides us with the beats of the desired timing. will go in detail later on.
- AVCC (Pin 30), GND (Pin 31) and AREF (Pin 32)
These are the power, ground and reference pins for the ADC(Analog to Digital Conversion) module of the ATmega32, as we won’t be going into ADC for a very long time and hence we will not be using these for now, so no use of going into detail for now.
This might enough for now, we will see the internals next time…


5 responses to “AVR – 02: Recognizing that 40 legged thing called AVR”
MY ENGraazi is Very bad but hopee krata hn jee k aap samjh jain gay meri bat ardu main bi.
yr zaid me nust electr0nix ka student hn
yr u r making uc much complex for the biggeners(sooory to say)…………..
itna time to ni hai k tmhari sari posts parh0n pr yr uc say related parhi hain lagta hai datasheet pay coment mar diye hain tm nay try to make out more simple
tmhari post parh k dil main microcontroller ko lay k dar beth gaya hai k pata ni kiya bum si cheez hogi ye jin chizon k nam liye hain unhain thora boht to explain kro warna awam dar jaey gi
yr mai ksi ko apni id ni batata is liye fake id say comment kr rha hn tmhay mind mat karna…….. for ur health
If only you would have left your email then I could have replied you personally….
You seem like you know about uC, if you think that my way is a little bit confusing then let it be, cause these are some of the things which are compulsory…..
Plus, YES this can be stated as a copy of the DATASHEET…. but until now those who have read it have given me the green signal except you….
Maybe you can't understand what I am trying to convey cause your “ENGraazi is Very bad”
k keep going with ur confusing way……..i have no problem.
i m not here to teach u n u r right i know all the families of uc quite well and had done more than 800 projects using almost all sort of these black buddies in last 3.5 yrs but i keep on visiting tutorials sites for new information in comparision of those i found u confusing
but to tell u the truth i visited ur site by chance when i was trying to find my friend zaid u r a begginer or trying to imitate that u r….. but try to atleast THINK what i have said i was not wrong and i will again say be simple and clear
and brief the things u name a little bit.
I will be briefing and putting up more content soon…. am caught between tests, work and other sorts of stuff….
YES, I am beginner….. more beginner then you would think…
though if only you would have given your ID, as I may need to consult something from you…….. since you are a senior….